Citrix XenServer is powerful hypervisor that is based on Linux (Redhat/Centos/Fedora family) and competes with Vmware ESXi and offer wide range of virtualization features for data centers. In general you can do a bare-metal installation of XenServer to your hardware server and create multiple virtual machines (VMs) inside XenServer host. Obviously you’ll need to have the possibility to boot VM from DVD-Rom to start installation of, let’s say, Linux Mint. You can do it using hardware DVD-Rom of the host XenServer or attach ISO image and make VM to boot into it.
By default XenServer can attach ISO images and make them available to VMs if ISOs are stored on a separate NFS server. In this post you’ll see how to avoid creation of NFS share and attach ISO image stored on XenServer host locally.
1. Connect to XenServer SSH service via management interface using root password:
ssh [email protected] -v
where 192.168.1.99 is IP address of XenServer host.
2. Create directory where you will store ISO images and then exit from XenServer’s SSH.
mkdir /var/opt/xen/iso_import/ISO1
exit
3. Copy ISO images to newly created directory. I assume my readers are Linux users so you can use below command to transfer files via SSH. Btw, command is the same if you’re using OS X:
scp Downloads/your_image.iso [email protected]:/var/opt/xen/iso_import/ISO1
4. Make local ISO library available for VMs in XenServer:
xe sr-create name-label=ISO1 type=iso \
device-config:location=/var/opt/xen/iso_import/ISO1 \
device-config:legacy_mode=true content-type=iso
5. Make sure ISO_Library is attached to XenServer:
xe vdi-list
In case of success you’ll something like this in the output:
uuid ( RO)                : 025c79f8-02dc-4950-8da5-d60f4675ca77
          name-label ( RW): your_image.iso
    name-description ( RW):
             sr-uuid ( RO): 3caefbd6-8683-cc4b-e642-e3540d0fe13e
        virtual-size ( RO): 168099840
            sharable ( RO): false
           read-only ( RO): true
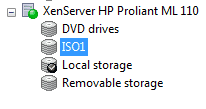
That’s it, you’ll see new ISO in XenCenter after this step:
WARNING: When copying ISO images to XenServer’s local filesystem keep an eye on free disk space – XenServer allocates not to much gigabytes for hypervisor itself so three or four ISO images may take all free HDD space and cause problems with systems running in VMs. Use df command e.g. “df -h /” to get info about free space in root filesystem.


