This article will show you how to configure a basic network with WiFi Bridging, DHCP on a fresh install of OpenWrt – with explanations and screenshots.
This guide follows on from LinuxScrew’s guide to setting up OpenWrt on a BT HomeHub 5 – but you can follow along on any device (including a Raspberry Pi!).
This article assumes you have an OpenWrt device you wish to start using. We’ll start by connecting it to your home WiFi network to get it online and then setting it up to broadcast its own WiFi network with its own DNS and DHCP settings.
1. Power Up and Connect
Power up your OpenWrt device and plug it into your computer via Ethernet.
By default OpenWrt should have no wireless networks defined -and we’ll modify the configuration anyway, so a wired connection will be necessary.
If you can’t access your OpenWrt device via a web browser on the default IP range, check if it conflicts with your existing network. You may have to disconnect your computer from your home network while you set things up initially so that you aren’t connected to two conflicting networks.
The easiest way to do this is often to enable flight mode, which will disable your WiFi connection and leave only your wired connection to OpenWrt.
2. Log In to OpenWrt
Head to the default IP address used by OpenWrt:
http://192.168.1.1
…and login.
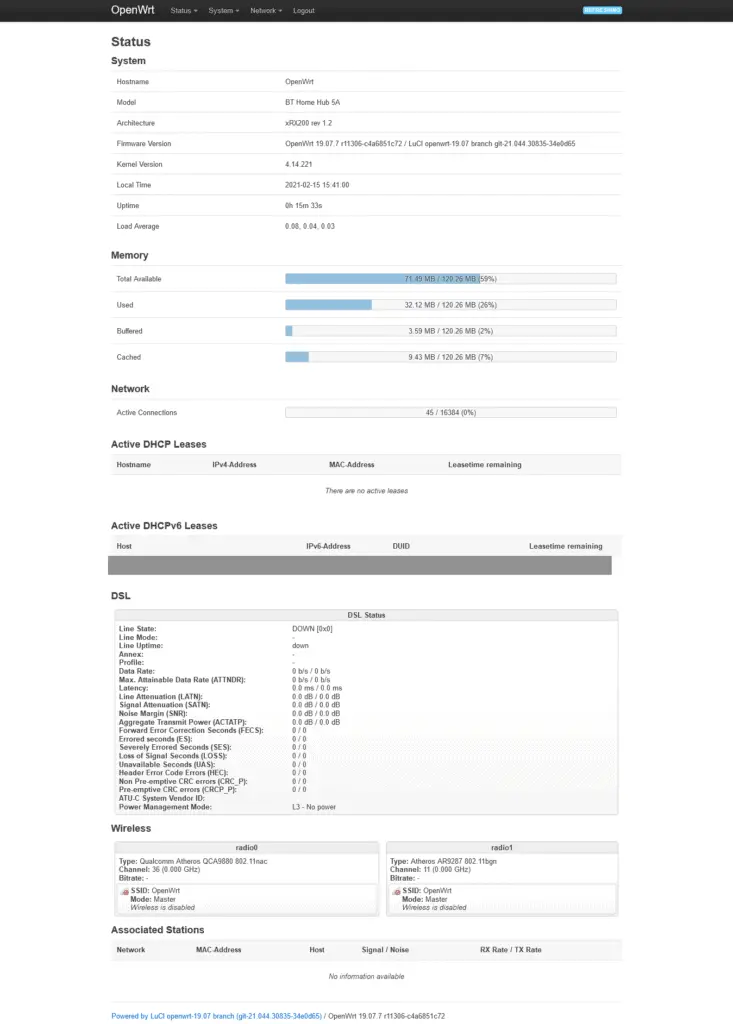
You’ll see the following page with a bunch of stats about your router:
Change IP Address and Set Up DHCP
The first step is the change the IP address of OpenWrt and the DHCP server it hosts.
Why? Because if your home network is also set up to use the network 192.168.1.0/24, OpenWrt will be struggling to find the correct routes to reach it, as it uses the same network addresses by default.
Click here to find out more about networks, IP addresses, and subnets.
DHCP (Dynamic Host Configuration Protocol) automatically assigns IP addresses on your network. We’ll need to set a new IP for the router, which will also change the address range which DHCP will assign.
So, before continuing, we need to set up OpenWrt with some new IP address details. Navigate to:
Network -> Interfaces
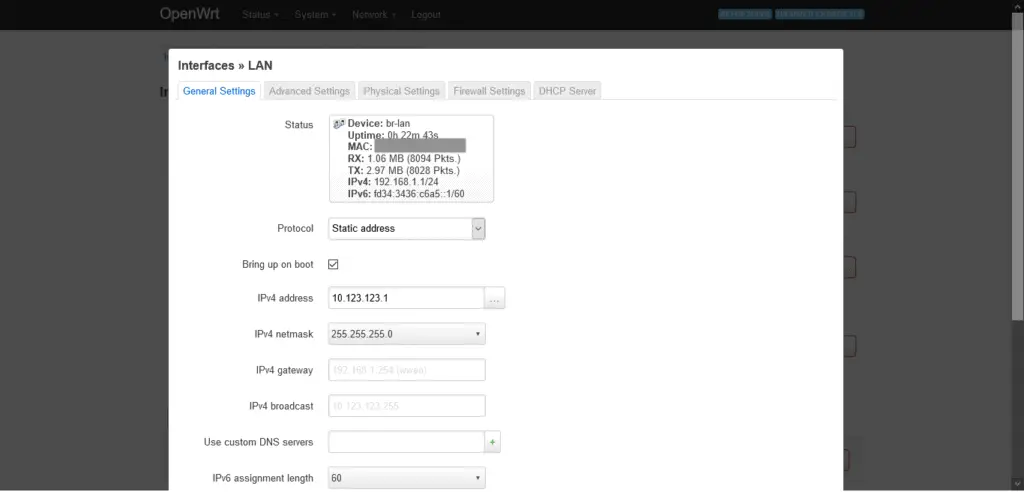
And click on the Edit button next to the LAN interface.
Under General Settings, find the IPv4 Address entry.
Currently, it is 192.168.1.1. This needs to be changed to something less common and less likely to conflict. I have chosen:
10.123.123.1
Which should steer well clear of the network address ranges commonly assigned by consumer routers.
If you decide to use a different range, make sure it complies with the rules for local IP addresses, so you don’t get a conflict!
Fill in the new IP address, hit Save.
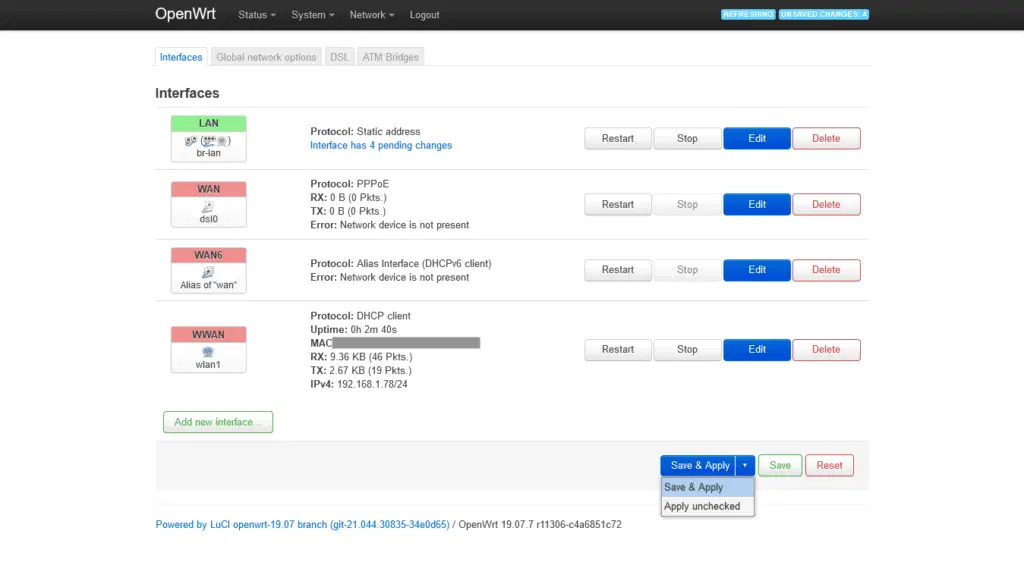
This time (and only this time!), rather than clicking Save and Apply at the bottom of the page, toggle the dropdown next to it and select Apply Unchecked, then click the Apply Unchecked button to apply the changes.
As the device’s IP address will be changing, the configuration will not be able to connect to it afterward to confirm the change, and the configuration will rollback. So we don’t want to check the configuration after it is changed.
As the network configuration has changed, you may need to disconnect and reconnect the ethernet cable to your OpenWrt device or restart networking to refresh the DHCP assigned address on your computer.
You should be able to now reconnect to your OpenWrt device at the address
10.123.123.1
If it’s been a few minutes and you still can’t connect, try hard-rebooting your OpenWrt device by powering it off for a minute and powering it back on.
Set Up WiFi Bridge
Navigate to:
Network -> Wireless
From the dropdown menus at the top of the page to access the WiFi settings page:
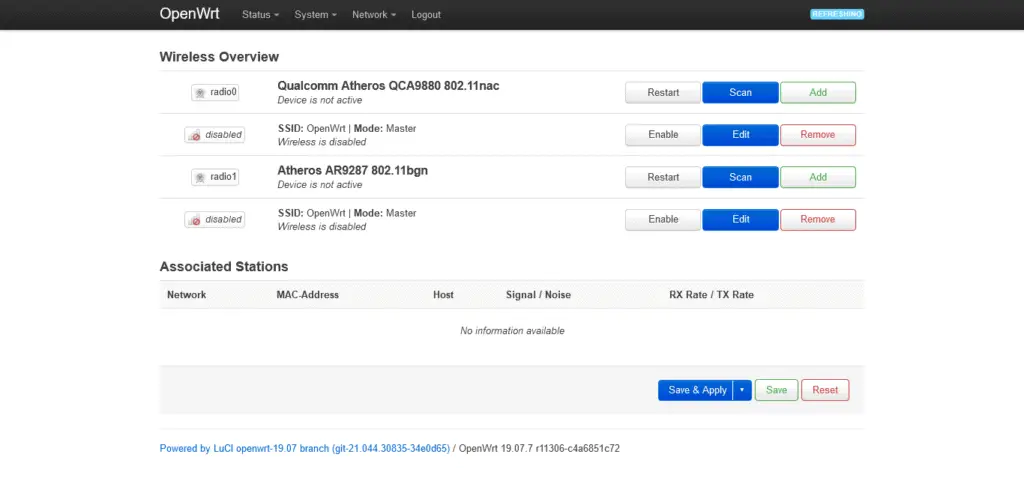
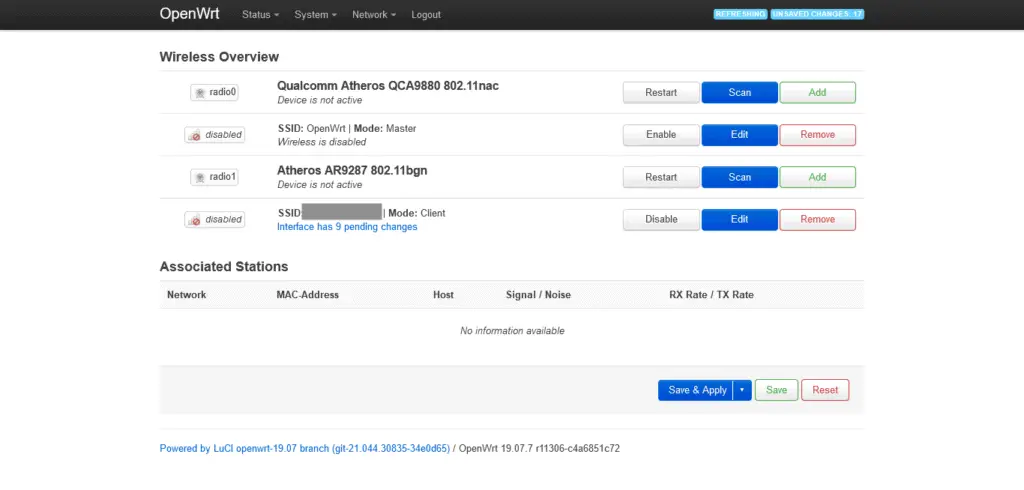
You’ll see a list of wireless network interfaces and their status.
Most devices will have two WiFi interfaces – a legacy 802.11bgn and a newer 5Ghz 802.11nac interface. This is usually so that older devices can connect to the router on the legacy interface and newer ones on the faster 5GHZ.
Rather than doing this, let’s connect the legacy WiFi interface to our existing home WiFi network and set up the 5Ghz interface as the network broadcast by OpenWrt. This means old devices won’t be able to connect, but who cares.
This will get the OpenWrt box online wirelessly, and then let us configure a WiFi network provided by OpenWrt with all of the extra features that allow for, without having to alter the configuration of the existing home network (which is sometimes a good idea if you have family members working from home you don’t want to disturb).
Connect to Your Home Network
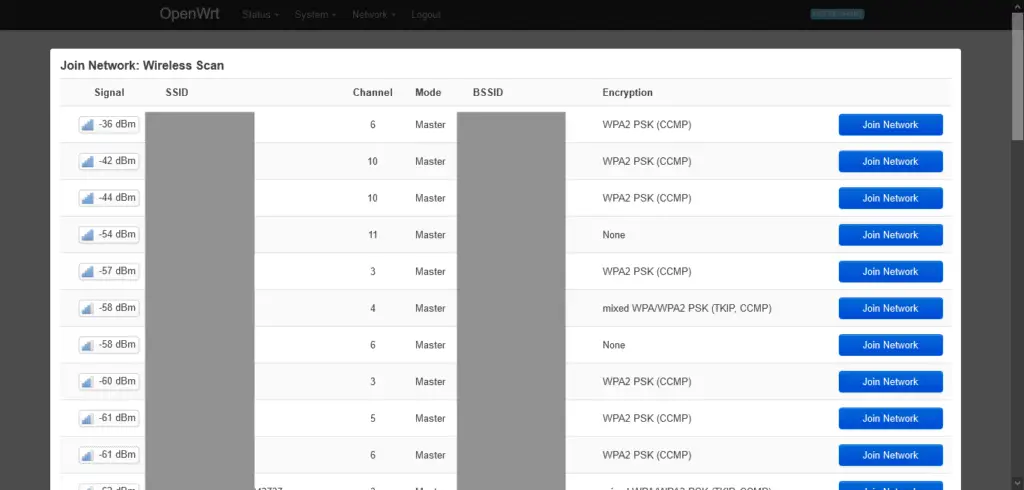
To connect OpenWrt to your home network, click the Scan button next to the legacy interface.
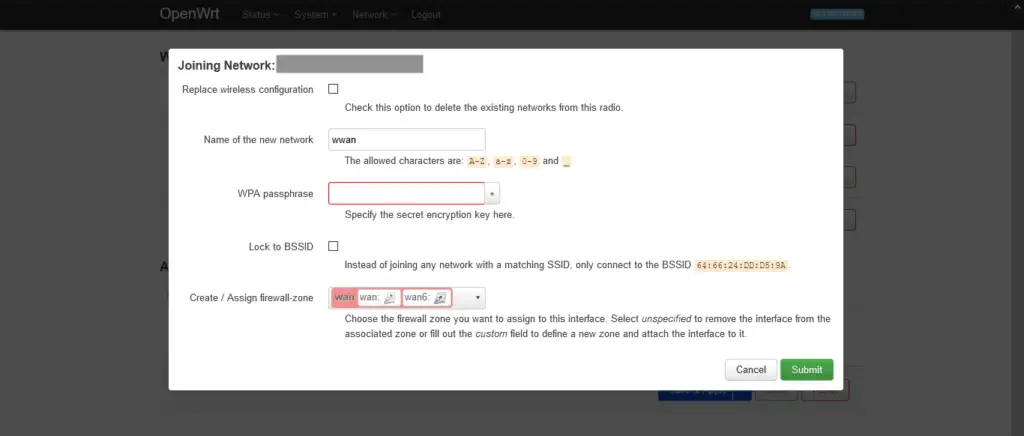
Click on the Join Network button next to your network, and you’ll see a configuration screen:
Check Replace wireless configuration to ensure any previous or default configuration for this interface is removed.
Enter your WiFI passphrase.
Check Lock to BSSID. This is good for security – it helps stop someone nearby from imitating your home network router and tricking OpenWrt into connecting to it.
Leave everything else as-is and hit the green Submit button.
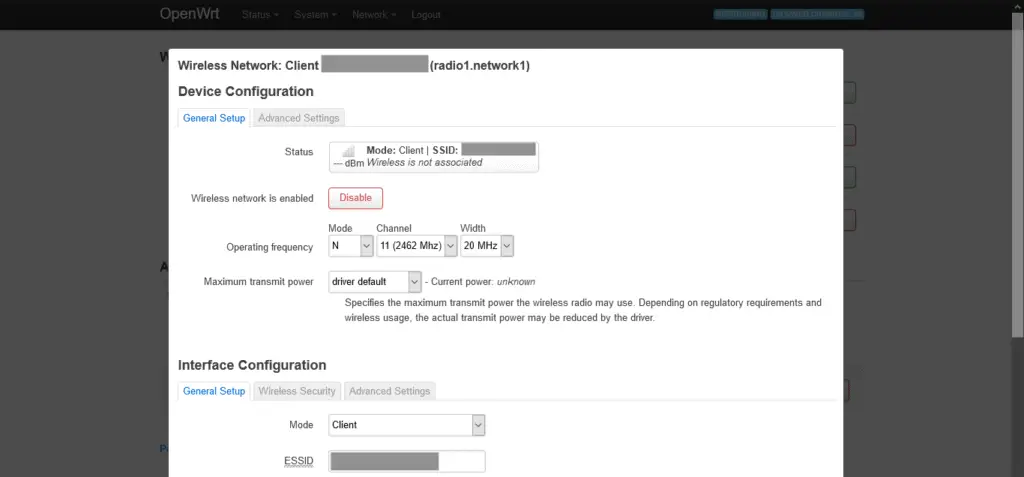
Leave everything on the next page as it is – this is the newly generated configuration. Hit Save.
The configuration has been updated but not applied, as services need to restart. You can see the 9 pending changes there next to the interface.
Click on Save and Apply to apply the new configuration.
Reboot
As the routes will have changed (OpenWrt will use your home networks DHCP and DNS settings to get online) – you may need to reboot for the full configuration change to take effect.
Navigate to:
System -> Reboot
…from the navigation dropdowns, hit the Perform Reboot button, and wait for a bit.
Your OpenWrt device is now online via your home WiFi network!
Testing the New Connection
OpenWrt includes tools to check that you are connected to the network:
Go to:
Network -> Diagnostics
…from the dropdowns at the top of the page.
Next, click on the IPv4 Ping button.
Wait a bit, and you should see something like this on success:
PING openwrt.org (139.59.209.225): 56 data bytes
64 bytes from 139.59.209.225: seq=0 ttl=54 time=30.596 ms
64 bytes from 139.59.209.225: seq=1 ttl=54 time=23.814 ms
64 bytes from 139.59.209.225: seq=2 ttl=54 time=23.686 ms
64 bytes from 139.59.209.225: seq=3 ttl=54 time=23.381 ms
64 bytes from 139.59.209.225: seq=4 ttl=54 time=29.441 ms

--- openwrt.org ping statistics ---
5 packets transmitted, 5 packets received, 0% packet loss
round-trip min/avg/max = 23.381/26.183/30.596 ms
If there is a problem, you’ll get a message telling you what went wrong.
Set up an OpenWrt WiFi Network
At this stage, OpenWrt is online and up to date.
Your computer should also be online via the wired connection to the WRT box.
Time to add that second WiFi connection on OpenWrt so you can remove the ethernet cable and connect to it wirelessly.
The title of this article calls this link between two Wifi networks a ‘bridge.’ Technically, the way things will be configured isn’t a bridge – your home WiFi network and the WiFi network provided by OpenWrt will be isolated from each other.
The setup which will result is called ‘Double NAT‘ – the OpenWrt router won’t be connected directly to the internet; it will be connected to another router (your home WiFi router). This can cause issues with some services like hosting public internet servers and some online games but can be preferable for new users so that they don’t have to mess with their home network and risk-taking themselves completely offline.
Once you’re an OpenWrt master, you can replace your home router with your OpenWrt device and remove the ‘Double NAT’ limitations.
Navigate back to:
Network -> Wireless
You’ll see Your two radio WiFi interfaces – one connected from the previous steps, one listed as Device not active.
Click on the Edit button next to the OpenWRT network under the inactive 5Ghz interface.
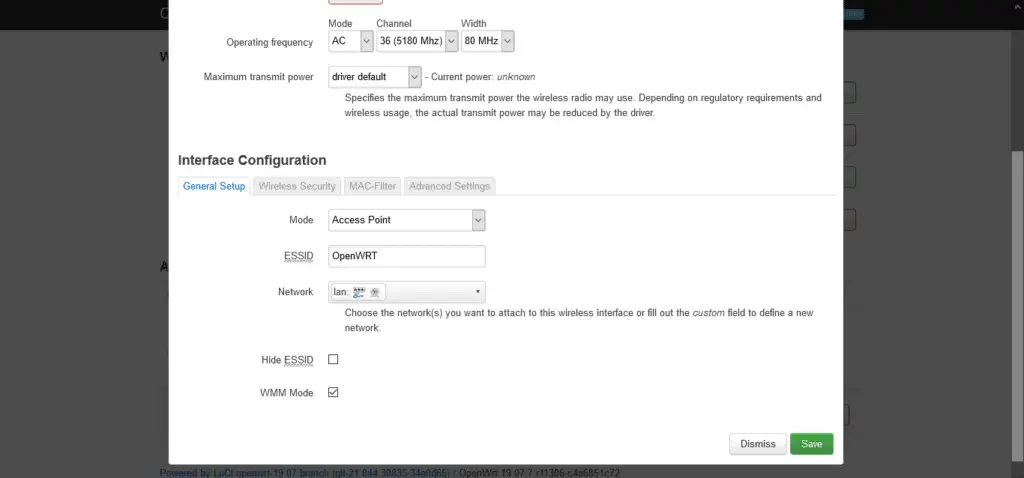
Scroll down to Interface Configuration:
Change the SSID (wireless network name) if you like, and assign the new WiFi network to the LAN network.
Click on the Wireless Security Tab.
Select WPA2-PSK (Strong Security), and enter your Key (network password).
It’s essential to make sure you set a wireless key! Your network will be insecure without one!
Click Save.
Then click Save and Apply at the bottom of the page.
Now you can safely enable the OpenWRT WiFi network by clicking the Enable button adjacent.
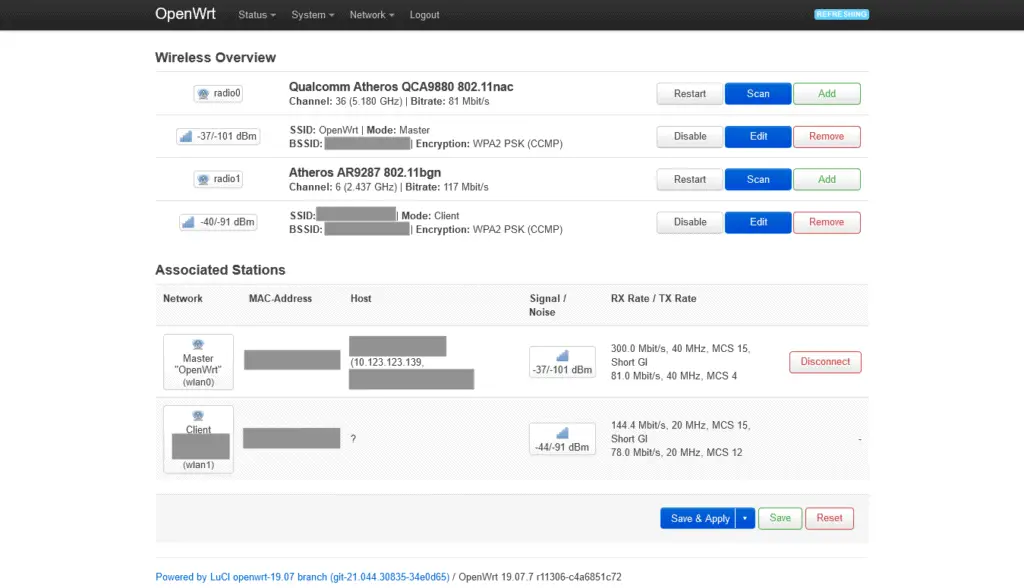
You will see that both WiFi interfaces are now active.
WARNING: Make sure every WiFi network in the list has an Encryption method listed next to it – if it doesn’t, anyone can connect!
Interfaces in mode ‘Master ‘are hosting a WiFi network, and those set to ‘Client‘ are connected to your home WiFi network.
As the new network was added to the ‘LAN‘ network, it will be on the same network as the ethernet ports on your OpenWrt device and already be configured to connect to the internet through your home WiFi network.
You can now disconnect your ethernet cable and connect to your new OpenWrt WiFi network.
Uh Oh – How to Recover from Mistakes
If something went wrong, check out the OpenWrt wiki on how to recover a botched configuration:
https://openwrt.org/docs/guide-user/troubleshooting/failsafe_and_factory_reset
Done!
You’re up and running – a fully functional network hosted on your OpenWRT box.
Your home network is as it was, and you can muck about with OpenWRT as much as you like without messing with it – the ‘Double NAT’ situation isn’t perfect, but you can now start getting familiar with OpenWRT and configuring your own segregated networks, file shares, and more – stay tuned for more articles!


