This tutorial will show you how to share your USB printer with iPhones and iPads using AirPrint from a Raspberry Pi.
AirPrint is Apple’s printer sharing technology and is required to print from iOS devices like iPhones and iPads, and can also be used to print from laptops and desktops running MacOS.
AirPrint is usually only available as a baked-in feature for consumer printers or by sharing a printer that has been plugged into a mac. However, it’s possible to set up an AirPrint server using freely available Linux software, so that you can keep using your existing printer. Read on for how to do this using a Raspberry Pi!
What You’ll Need
You’ll need the following to complete this tutorial:
- A Raspberry Pi
- A USB printer
- A keyboard/mouse/monitor for the initial Raspberry Pi setup
- A computer with an SD card slot to install Raspberry Pi OS
- A network connection (of course)
Setting up the Hardware
Setting up the required hardware is straightforward:
- Plug the printer in to your Raspberry Pi
- Temporarily plug the keyboard/mouse/monitor into your Pi for the initial setup steps
Setting up the Software for AirPrint
Installing Raspberry Pi OS
First, you’ll need to install the Raspberry Pi OS. Insert the SD card from your Raspberry Pi into your computer, and run the Raspberry Pi Imager.
Click ‘Choose OS’ and select ‘Raspberry Pi OS (other), and choose ‘Raspberry Pi OS Lite (64-bit)’ if you have a Raspberry Pi 4, or ‘Raspberry Pi OS Lite (32-bit)’ if you are using any other Pi. We only need the lite version as no desktop applications are required to host a print server, but you can of course follow these steps on the Desktop version if you want to.
Next, select your SD card as the storage the OS should be written to (make sure you have the right one selected – everything will be overwritten!).
When you’re ready, click the ‘WRITE’ button and wait for the image to be written and verified.
When it’s done, take the SD card from your computer, and install it in your Raspberry Pi. Boot your Pi when you’re ready for the next step.
Installing Required Packages
Once you’ve configured you Pi by selecting a keyboard layout and adding a username/password, you need to get your Pi connected to your network. If you’re connecting via ethernet cable, just plug in. To configure WiFi, run the Raspberry Pi Configuration tool:
sudo raspi-config
Then select System Options and then Wireless LAN , select your country, and enter the details for your wireless network.
After entering your WiFi credentials, select Interface Options and then SSH and enable the SSH server so that the Pi can be administered remotely (meaning we can remove the pesky keyboard/mouse/monitor and tuck the Pi behind the printer, out of sight).
Once that’s done, Select Finish.
To test that you are connected to the network, run:
ping 8.8.8.8
To ping Google’s public DNS servers – if you’re online, you’ll see success messages that look like this:
64 bytes from 8.8.8.8: icmp_seq=0 ttl=116 time=49.180 ms
64 bytes from 8.8.8.8: icmp_seq=1 ttl=116 time=13.590 ms
If you see timeouts or other failures:
Request timeout for icmp_seq 0
Request timeout for icmp_seq 1
…follow the above steps again as you may have mis-entered your Wifi network name or password.
Now that you’re online, get the software on your Pi up-to-date by running:
sudo apt update
sudo apt upgrade -y
Note: Make sure that you choose a secure username and password. We’ll be enabling SSH remote access on the Pi later on, so you don’t want anything that’s too easy to guess.
Detecting Your Printer
You can make sure that your USB printer has been detected by Linux by running:
lsusb
Look through the list of devices and make sure your printer is present – mine looks like this:
Bus 001 Device 004: ID 0000:0000 Brother Industries, Ltd HL-121W series
Printer Compatibility
Raspberry Pi OS comes with a number of built-in printer drivers, but if you find your printer is not working out of the box, you’ll need to consult with the manufacturers website to see if they provide their own Linux drivers.
Installing Avahi and SAMBA
Avahi Daemon is a Linux implementation of Apple’s Bonjour service that enables network discovery of shared files. printers, and other resources.
CUPS is the Common Unix Printer Service – the program that will manage and share your printer on the network.
Install both by running:
sudo apt install avahi-daemon cups -y
Next, add the user you configured earlier to the print admin group (if you do not do this, you will not be able to update the CUPS configuration from the web interface):
sudo usermod -a -G lpadmin USERNAME
Replace USERNAME with the username you set while initially setting up your Raspberry Pi.
Configuring CUPS
Configure CUPS to accept external network connections from any source:
sudo cupsctl --remote-any
Getting the IP of your Pi
To connect to your Raspberry Pi remotely, you’ll need to know it’s IP address on the network. This can be found by running:
ifconfig
To make it easier to connect in future, I suggest setting a static IP address.
Reboot
Reboot to apply any pending configuration changes:
sudo reboot
Remotely Connecting to CUPS
Now that your Pi is on the network and CUPS is running, you can view the CUPS admin panel by navigating to
https://YOUR-PI-IP:631
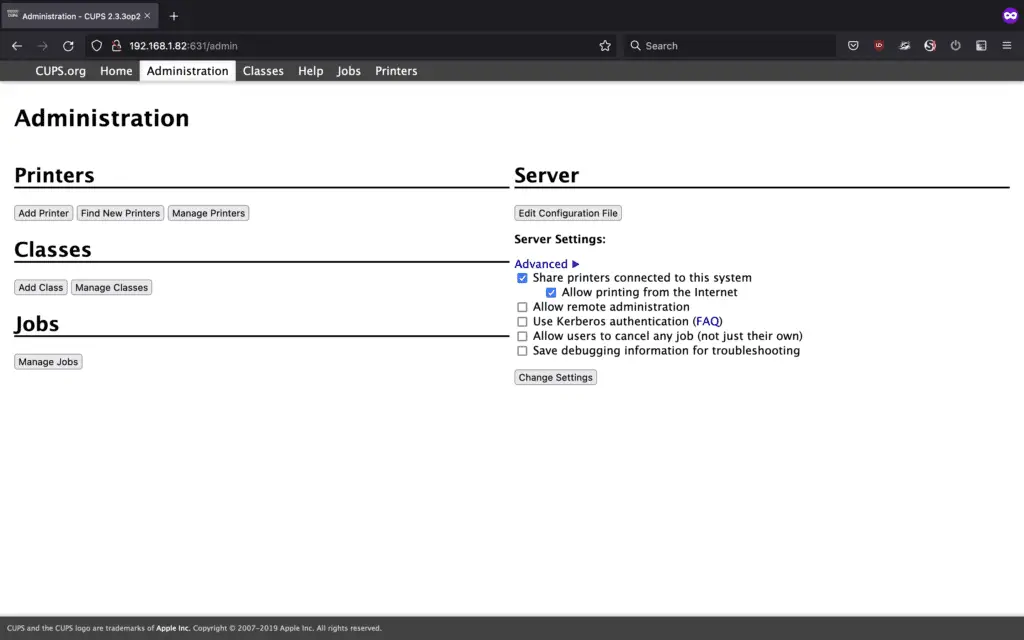
From a web browser on your computer. Click on the ‘Administration’ tab and you will see the following:

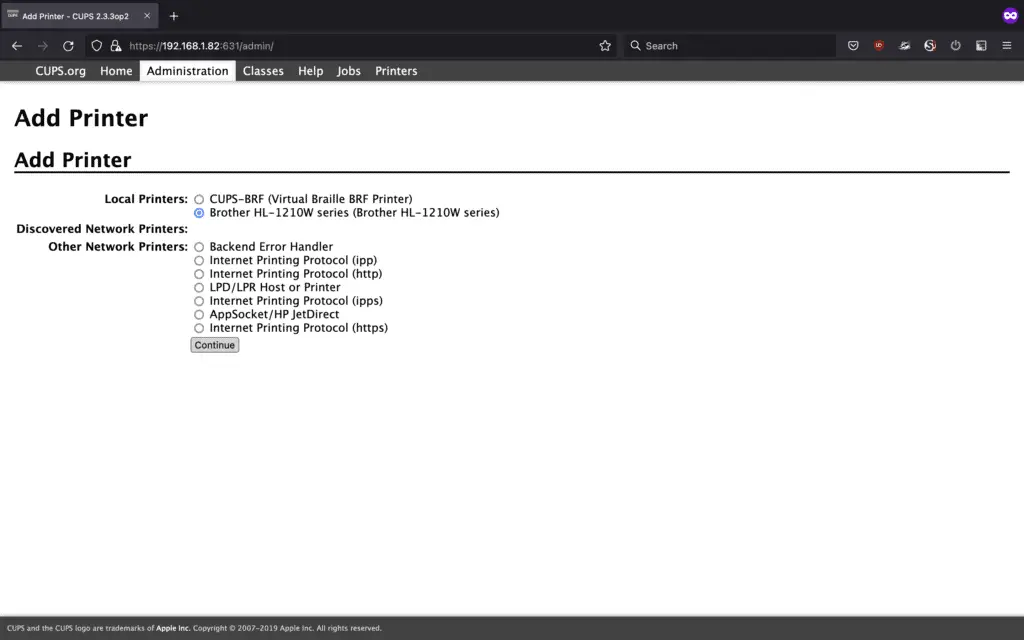
Click on Add Printer and enter the username and password for your Raspberry Pi as set earlier. Then, select your printer and click Continue:

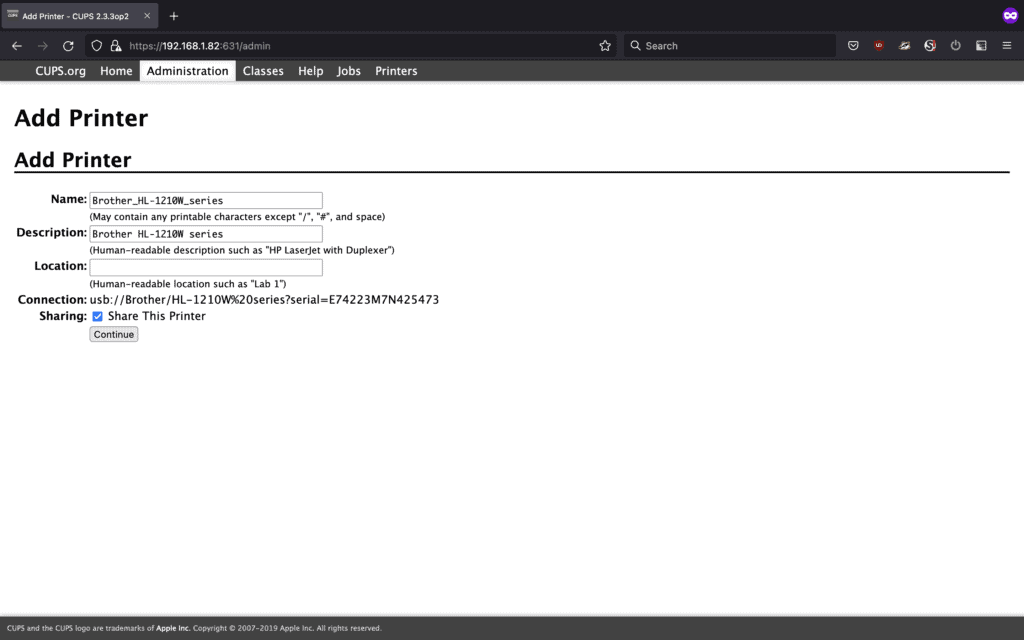
Then, set the printer name as your desired, check Share this printer and click Continue again:

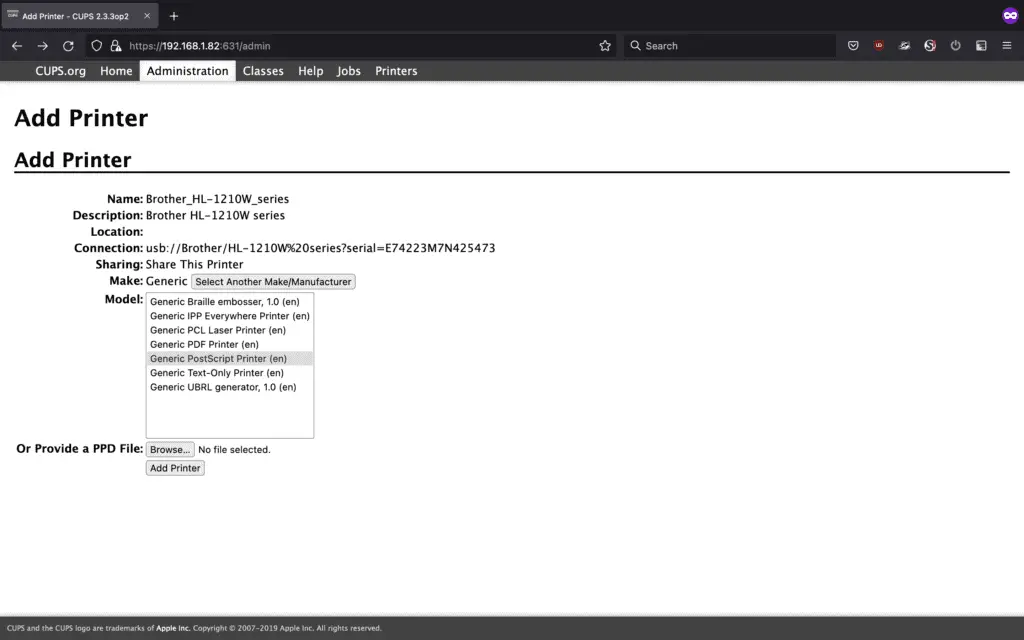
Next, select your printer driver from the list of installed drivers. If your printer is not listed and a Linux driver is not made available, you have two options:
- Select
Rawto let the device that is printing via the Pi handle the driver (so, if you’re printing from a Windows device, drivers installed on that device will be used) - If you want to try using generic drivers, select
Genericand thenGeneric PostScript PrinterorGeneric PCL Laser Printer(standards that many printers are compatible with)
Which one you select will depend on your printer and devices, so you may need to come back to this later and pick a different driver if things don’t work.

When you’ve selected a driver, click the Add Printer button.
You’re done!
And that’s it! The Avahi Daemon automatically shares your CUPS printers that have sharing enabled. There’s no need for any further configuration.

Here’s how my Raspberry Pi AirPrint printer looks when printing from iOS – neat!

